 |
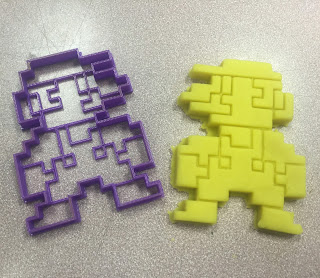
| Cookie Cutter Design by copy pastry_bp (Instagram) |
This project was inspired by a random search on Instagram where I stumbled upon an account of a woman in Brussels who makes custom cookie cutters from images sent to her. My design students are in the middle of two HUGE projects, and needed a little side project leading up to Christmas.
As with all projects we use one guiding document (this linked version is for our fidget design tool) that I adapted from IDEO's Toolkit for Educators using the Design Process. This document is not set in stone for any projects, but is meant to be a guide for students to track their progress, and can be adapted by anyone.
The Process
Students were asked the essential question, "How can we design a functional cookie cutter?" Students were given a class to come up with as many questions to ask me and each other. They spent this class researching cookie cutters, and looking at a few cookie cutters that I brought from home.
Some of the questions they came up with were (we collected them in a Google Doc):
- What material will we use?
- Who are we going to make the cookie cutters for?
- Who are we going to make the cookie cutters for?
- How big will the cookie cutters be?
- Can we use logos?
- Who are we making the cookie cutters for?
- How are we going to test the cookie cutters?
- What kind of cookie will we make?
- How thick will be the cookies?
- How do we make the details in the cookie?
- How many cookie cutters do we have to make?
- How thick will the dough need to be?
 What I like about gathering student questions together as a class activity is that students are essentially developing their own criteria for the final project. We hashed out the following criteria for our cookie cutters:
- To get the detail we wanted the cookie cutters will be 3D printed as opposed to made with metal (maybe next year)
- There will be a minimum of 3 layers in the cookie cutter, a cut through layer, and two other depths used to show detail
- Cutter size will be 4-5" across, but is flexible depending on the design
- Logos cookie cutters would be permitted if students created an original design first
 Designing and Iterative Process
From there it was off to the races! Students spend the next three weeks working on with main projects, and when waiting for 3D printing, they worked on their cookie cutters. We used Sketchup Pro to do all of our designing, with an additional plugin called Solid Inspector 2 to ensure our models where watertight and ready for printing. One things that often happens in Sketchup is that model get random holes and errant faces that mess up 3D prints and cause slicer programs to interpret the models in strange ways. Sometimes models are printed with a solid top face, or with a triangle hole in the middle of the model. I highly recommend using a model inspector and repair software when 3D printing! We use Meshmixer, as well as an online repair service that is fast and works pretty well!
A typical day of 3D printing in our lab: 3 cookie cutters, fidget tools, and other parts for various projects:
The Learning
 This is the first time I've done this project and it was enjoyable for students and for myself! I learned just as much as the students did!
Some quick points of learning from this project, we had lots of 'a ha' moments:
- The best material to test our cookie cutter prototypes with was play dough.
- Students learned quickly that the cutting edges of the 3D print needed to be very thin. Having thick cutting walls just squished the dough and made cutting a clean cookie edge difficult
- Having too much plastic on the top edge of the cookie cutter made it difficult to lift it off the dough.
- Rolling the dough to the correct thickness is a must!
- Scaling the cookie cutter was a challenge. Even though we knew what the thickness of the cookie dough was going to be (1/4" or approx 6.3mm, we round to 7mm) students still struggled with modeling. (next time we will sketch and cut out the design out of cardboard and measure then first).
- Smaller support structures inside the cookie cutter with an open back work best for releasing the cookie after pressing down.
- Less is more! Having too much detail meant too much surface area for dough to stick onto making clean cuts a challenge.
Here's an example of one of my students' cookie cutters. I used a 3D file viewer which gives me html code to embed this frame.
The Celebration
My colleague and amazing Food teacher Ms. French allowed us to take over her kitchens for a class just before Christmas to put our cookie cutters to the test. Next time I'd use a different cookie recipe, but overall students were able to see how their cookie cutters worked. (open in another window and watch in HD!)
Summary of Learning
One thing that I always do is have students do a summary of learning for each project. While each prototype and design iteration is an opportunity for a conversation with me or with anther student about their work in progress, the module summary is a way for students to reflect on where they started and where they ended up. Students take photos, video and screen shots of their work in progress, and keep all of their files in a folder in their Google Drive. I frame this summary as something that they would show their parents, another teacher or people around the world about what they have learned throughout the project.
New this semester I have changed the format of the summary to include an iBook instead of a blog post or students making a wiki. Students are the authors of their books, and are creating the books for a wider audience than just me the teacher. Another thing that I really like about the format of iBooks is that you can embed 3D object files as a widget, allowing students to create multi-touch books that viewers can experience and manipulate their designs. Its the perfect use of this tool.
- How thick will be the cookies?
- How do we make the details in the cookie?
- How many cookie cutters do we have to make?
- How thick will the dough need to be?
 What I like about gathering student questions together as a class activity is that students are essentially developing their own criteria for the final project. We hashed out the following criteria for our cookie cutters:
- To get the detail we wanted the cookie cutters will be 3D printed as opposed to made with metal (maybe next year)
- There will be a minimum of 3 layers in the cookie cutter, a cut through layer, and two other depths used to show detail
- Cutter size will be 4-5" across, but is flexible depending on the design
- Logos cookie cutters would be permitted if students created an original design first
 Designing and Iterative Process
From there it was off to the races! Students spend the next three weeks working on with main projects, and when waiting for 3D printing, they worked on their cookie cutters. We used Sketchup Pro to do all of our designing, with an additional plugin called Solid Inspector 2 to ensure our models where watertight and ready for printing. One things that often happens in Sketchup is that model get random holes and errant faces that mess up 3D prints and cause slicer programs to interpret the models in strange ways. Sometimes models are printed with a solid top face, or with a triangle hole in the middle of the model. I highly recommend using a model inspector and repair software when 3D printing! We use Meshmixer, as well as an online repair service that is fast and works pretty well!
A typical day of 3D printing in our lab: 3 cookie cutters, fidget tools, and other parts for various projects:
The Learning
 This is the first time I've done this project and it was enjoyable for students and for myself! I learned just as much as the students did!
Some quick points of learning from this project, we had lots of 'a ha' moments:
- The best material to test our cookie cutter prototypes with was play dough.
- Students learned quickly that the cutting edges of the 3D print needed to be very thin. Having thick cutting walls just squished the dough and made cutting a clean cookie edge difficult
- Having too much plastic on the top edge of the cookie cutter made it difficult to lift it off the dough.
- Rolling the dough to the correct thickness is a must!
- Scaling the cookie cutter was a challenge. Even though we knew what the thickness of the cookie dough was going to be (1/4" or approx 6.3mm, we round to 7mm) students still struggled with modeling. (next time we will sketch and cut out the design out of cardboard and measure then first).
- Smaller support structures inside the cookie cutter with an open back work best for releasing the cookie after pressing down.
- Less is more! Having too much detail meant too much surface area for dough to stick onto making clean cuts a challenge.
Here's an example of one of my students' cookie cutters. I used a 3D file viewer which gives me html code to embed this frame.
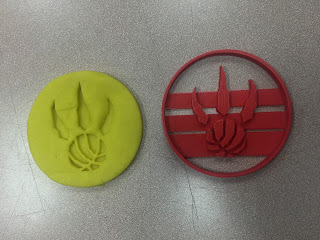
 |
| My rugby team's logo as a cookie cutter! |
The Celebration
My colleague and amazing Food teacher Ms. French allowed us to take over her kitchens for a class just before Christmas to put our cookie cutters to the test. Next time I'd use a different cookie recipe, but overall students were able to see how their cookie cutters worked. (open in another window and watch in HD!)
Summary of Learning
New this semester I have changed the format of the summary to include an iBook instead of a blog post or students making a wiki. Students are the authors of their books, and are creating the books for a wider audience than just me the teacher. Another thing that I really like about the format of iBooks is that you can embed 3D object files as a widget, allowing students to create multi-touch books that viewers can experience and manipulate their designs. Its the perfect use of this tool.
